We may earn a commission from links on this page, at no extra cost to you.
What this means in real life
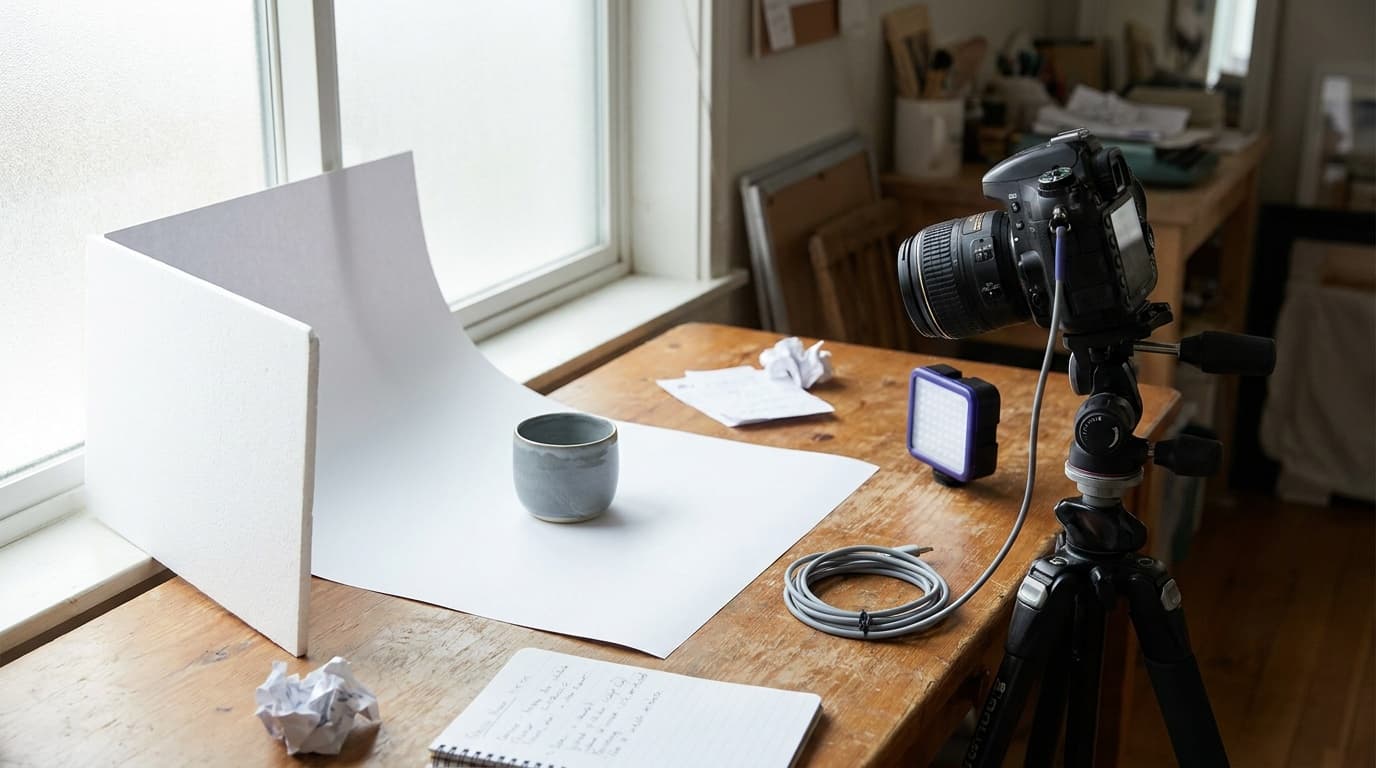
The two things that make a product look cheap are hard shadows and a messy background. Both are fixable at home. A window is a very large light source relative to a small object, so the light wraps gently and the shadows go soft. A roll of paper or a clean sheet removes the background. After that, the only real job is exposing carefully and keeping the camera still.
[MEDIA: overhead diagram of a window, product on a table, sheer curtain diffusing the light, and a white foam board as fill on the shadow side]
The gear
You need very little. A camera that lets you set aperture and shutter, a tripod, and one large white surface to bounce light back into the shadows. A sheet of white foam board from a craft store works as both a reflector and a sweep behind small items. A sheer white curtain or a thin bedsheet over the window softens harsh direct sun. If you want to kill reflections on glossy or metal products, a polarizing filter helps, though careful light placement matters more.
The settings
Because the product is not moving, you can shoot at a small aperture for depth and a slow shutter on the tripod, with no penalty.
A small aperture matters more here than in most genres. Up close, depth of field is shallow, so a wide aperture leaves the back of the product soft. Stopping down to f/8 or f/11 keeps the whole item crisp. Because you are on a tripod, the resulting slow shutter is not a problem. Keep ISO at its base value; there is no reason to raise it.
The technique
Place the product so the window light comes from the side, not straight on. Side light gives shape and shows texture; flat front light makes the product look like a sticker. Then put your white card on the opposite, shadowed side and angle it to bounce light back in. Move the card closer to lift the shadows, further away to deepen them. That single push and pull is most of product lighting.
For a clean background, curve a single sheet of paper or board up behind the product so there is no hard line where the table meets the wall. This "sweep" gives the seamless white look without a studio. Shoot slightly above the product for catalog-style shots, or straight on at its level for a more dramatic hero frame.
Common mistakes
The most common mistake is using a small light source, like a desk lamp or the on-camera flash, which gives hard ugly shadows. Bigger and softer always wins, which is why the window beats almost anything. The second is shooting wide open and ending up with a soft back edge; stop down. The third is a tilted or cluttered background. Clean the surface, square the camera, and curve the sweep. The fourth is mixed light: do not blend warm room bulbs with cool window light, because the white balance cannot please both. Turn the room lights off and let the window do the work.
Where this fits
These settings are just the exposure triangle applied to a still subject you fully control, which is the easiest situation to learn it in. Once the lighting feels repeatable, the product photography genre guide covers styling, hero angles, and shooting for marketplaces. If your product is food, the food photography walkthrough uses the same window-light approach with a few plating tweaks.
Do I need a lightbox or light tent?
Not for most products. A light tent diffuses light and hides the background for very small items like jewelry, which is genuinely useful at that scale. For anything larger, a window plus a white card gives softer, more flattering light and far more control over direction.
Why are my home product shots soft at the back?
Almost always too wide an aperture. Up close, depth of field is thin, so an f/2.8 shot leaves the rear of the product blurred. Stop down to f/8 or f/11 and put the camera on a tripod so the slow shutter that follows does not blur the whole frame.
What is the best background for product photos at home?
A single curved sheet of white paper or foam board, lit separately from the product, gives the clean seamless look. Avoid textured walls and visible table edges. If you want a lifestyle feel instead, a simple wood surface or neutral fabric reads well without competing with the product.
Related Learn guides
Black and White Photography: How to See and Shoot in Mono
Black and white photography is about light, contrast, and shape rather than color. Here is how to shoot for mono and convert raw files cleanly.
Read guide
Camera Settings for Snow: How to Keep White Snow White
Snow fools your meter into gray, underexposed photos. Here are the settings and the exposure compensation that keep snow bright, clean, and the right color.
Read guide
Color Grading Basics: Giving Your Photos a Consistent Look
Color grading is the creative step after correction, where you shape mood and a signature look. Learn the core tools and how to build a style without overdoing it.
Read guide
Color Temperature and Kelvin Explained: Reading Light by the Numbers
Color temperature in Kelvin describes how warm or cool a light is. Learn the scale from 3200K tungsten to 7500K shade and how to dial it in by hand.
Read guideResearched, not personally tested: picks come from specs, verified-owner reviews, and expert sources, scored into the Aperture Score. As an Amazon Associate I earn from qualifying purchases. We may earn a commission from links here, at no extra cost to you. How we research →