We may earn a commission from links on this page, at no extra cost to you. Picks are researched, not sponsored.
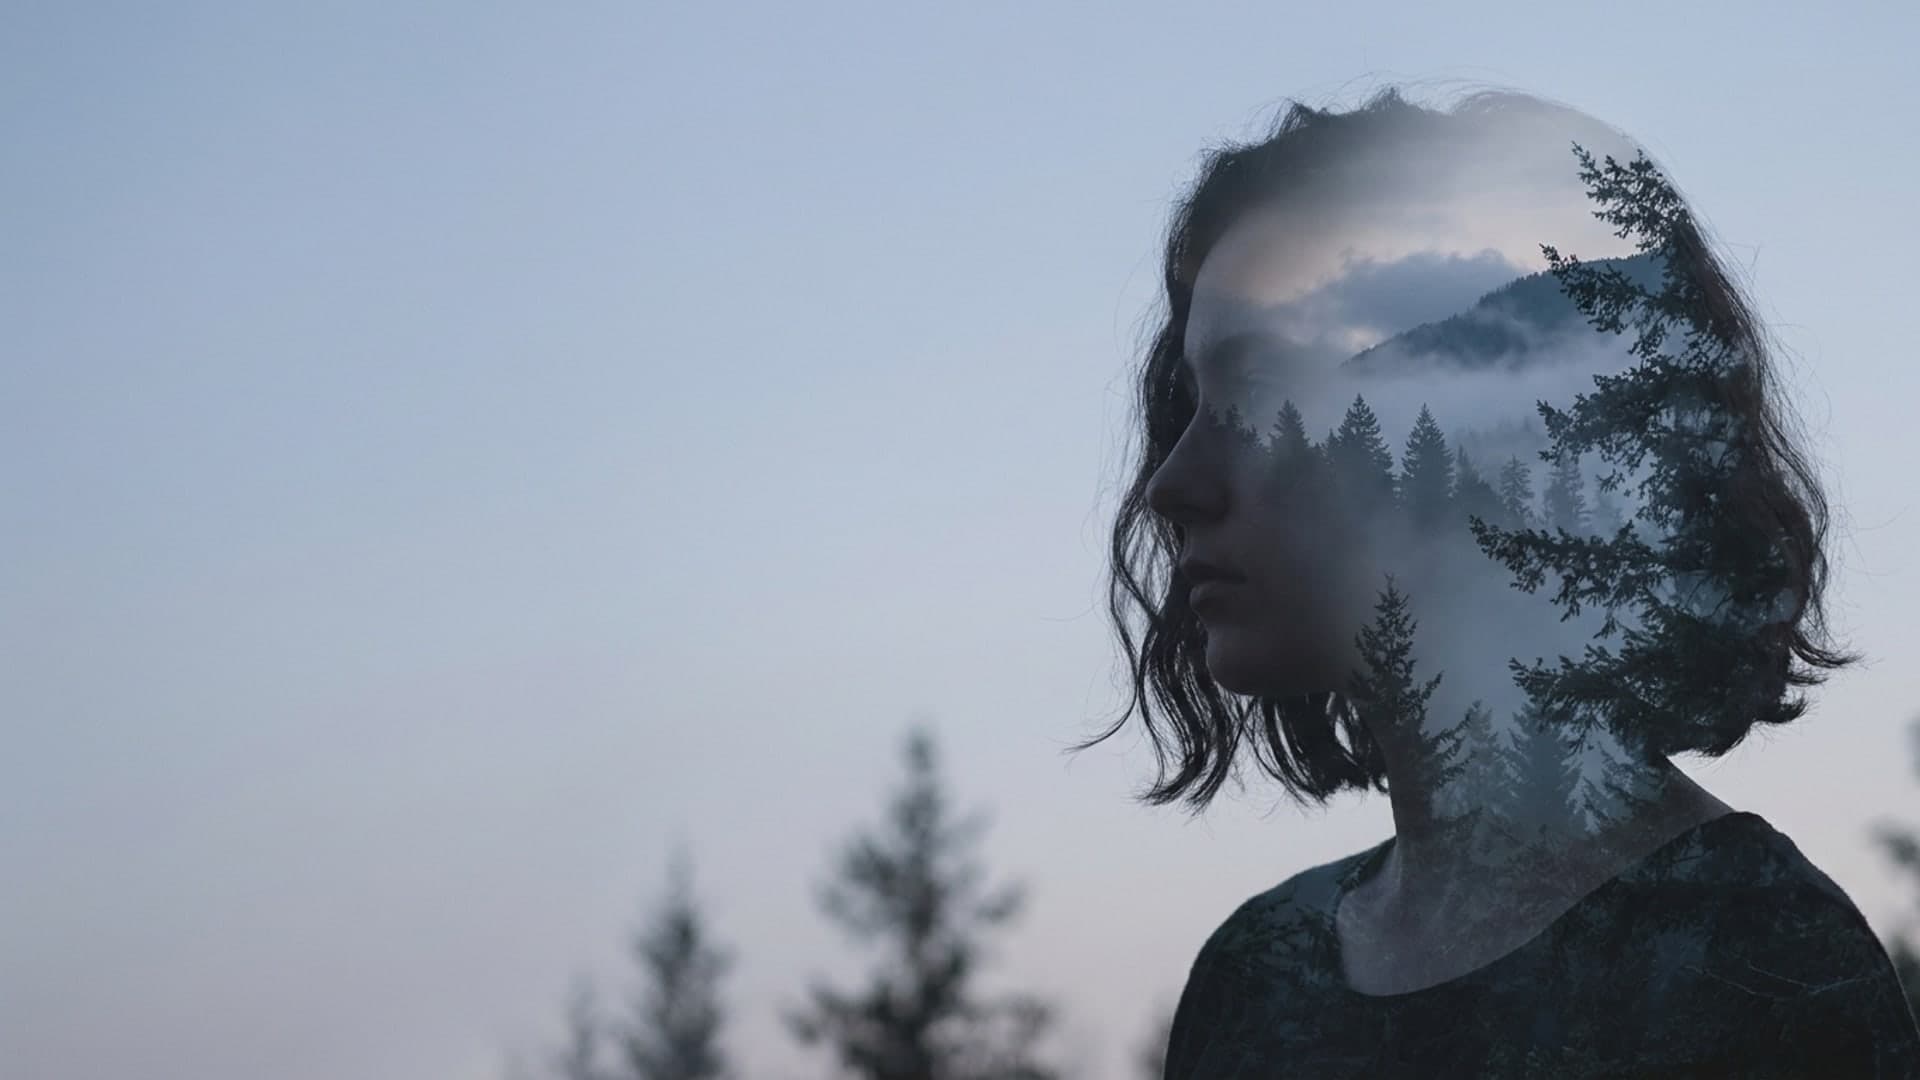
On film, a double exposure happened when you exposed the same frame twice without advancing the roll. The second image printed on top of the first, mostly in the areas the first left dark. Digital cameras recreate that behavior with a multiple exposure mode, and editing software lets you do the same thing with far more control.
How does a double exposure work?
Light adds up. Wherever the first frame is dark, it left room for the second frame to show. Wherever the first frame is bright, it is already near white, and the second frame barely changes it. That is why the classic double exposure portrait starts with a silhouette: the dark profile becomes a window for the second image, while the bright sky around it stays clean.
The exposure triangle still applies, with one twist. If you simply add two normally exposed frames, the result is too bright. Each frame needs less exposure, or the camera has to average them, so the final image lands at a normal brightness.
In-camera multiple exposure modes by brand
Not every camera has a multiple exposure menu, and the options vary by model. Check your manual before planning a shoot around it. Here is what three manufacturers document.
| Brand | Frames | Blend options | Notes from the manufacturer |
|---|---|---|---|
| Canon EOS (many models) | 2 to 9 | Additive, Average, (Comparative) Bright, (Comparative) Dark | Not all models have all four; works with RAW or JPEG; older images can be combined in some modes |
| Nikon Z (for example Z7 II and Z6 II) | 2 to 10 | Add, Average, Lighten, Darken | The combined image is recorded as JPEG; individual NEF (RAW) frames can be saved too |
| Fujifilm X (for example X-M5) | Up to 9 | Additive, Average, Bright, Dark | Earlier exposures appear over live view to guide the next frame |
Sources: Canon Europe's multiple exposure guide, Nikon's Z7 II and Z6 II menu guide, and Fujifilm's X-M5 manual.
What the blend modes do
- Additive (Add): the exposures are added together with no adjustment. Canon's guide compares this to film and says to underexpose each frame so the combined result comes out correctly exposed. As a starting point for two frames, try about one stop under on each.
- Average: the camera reduces each frame automatically so the total is correct. Nikon describes the gain for each frame as one divided by the number of shots. Average is the easiest mode for a first attempt, but it can make both images look a little faded.
- Bright (Lighten): the camera keeps the brightest pixel at each location. Canon suggests it for bright subjects on a dark background, such as a moon over a night sky.
- Dark (Darken): the camera keeps the darkest pixel at each location. Canon notes it can remove bright areas, such as a subject moving across a daytime sky.
Fujifilm's manual notes that Bright and Dark can mix colors depending on brightness and hue, and Canon says its Bright mode can be unpredictable, so try Additive or Average first.
Canon also notes that its Digital Photo Professional software has a compositing tool, so Canon shooters without the in-camera feature can still combine frames.
The silhouette method, step by step
This is the look most people mean when they search for double exposure.
- Find a bright, plain background. An overcast sky or a pale wall works. Avoid busy backgrounds; anything in them will show up in the final image.
- Shoot the portrait as a silhouette. Place your subject in profile against the bright background and expose for the background, so the subject goes dark. A typical readout outdoors is f/8 · 1/500 · ISO 100. The backlight and silhouettes guide covers how to keep the edge clean.
- Leave space. Put the profile on one third of the frame, as in the rule of thirds, so the sky gives the image room.
- Shoot the second image. Trees, a skyline, flowers, or water texture all work. Strong shapes against a bright sky read best. Expose it normally or slightly under, such as f/8 · 1/250 · ISO 100.
- Check the overlay. If your camera shows the first frame over live view, move until the second image sits where you want it inside the silhouette.
- Review at full size. Look at the edges of the profile and the face. Small shifts change the result a lot, so shoot several versions.
Simple, bold shapes beat detail. A clear profile with a defined nose and chin and a second image with strong lines, such as the leading lines of a road or tree trunks, will read better than two busy photos.
How to make a double exposure in editing
Editing gives you control over placement, scale, and exactly where each image shows. The basic Photoshop-style workflow:
- Stack the images. Put the silhouette portrait on the bottom layer and the second image on top.
- Change the blend mode of the top layer. Adobe defines Screen as a mode where the result is always lighter, screening with black leaves the color unchanged, and screening with white produces white. Adobe compares the effect to projecting multiple slides on top of each other, which is close to a film double exposure. Lighten keeps whichever pixel is lighter.
- Position and scale the top image until it fits inside the silhouette.
- Add a layer mask to hide the second image where you do not want it, such as over the face or outside the head. Paint with a soft brush at low opacity for smooth transitions.
- Unify the color. A single color grade or black and white conversion over both layers makes the result look like one photograph. Black and white photography is a natural fit for this look.
For the opposite look, use Multiply or Darken. Adobe describes Multiply as always producing a darker result, so a dark image placed over a light one shows through the bright areas instead. That works for dark textures over a pale subject.
If you shot the frames in RAW, do your basic exposure and white balance first, then export to the layered editor. RAW vs JPEG explains why that order keeps more detail.
Common mistakes
- A busy background behind the portrait. Any detail in the bright areas competes with the second image. Use plain sky or a seamless wall.
- Two equally busy images. One image should be a simple shape and the other should carry the texture.
- Overexposed results in Additive mode. Underexpose each frame, or switch to Average.
- Ignoring the face. The eye goes to the face first. Mask the second image away from the eye and mouth if it makes the face hard to read.
- Mismatched light. A warm portrait blended with a cool landscape looks pasted together. Match the color in editing or shoot both images in similar light.
Where this fits
Double exposure builds on silhouettes, composition, and editing at the same time. Practice the silhouette in backlight and silhouettes, the framing in composition techniques, and the layering in post-processing intro. For people pictures more broadly, the portrait photography guide covers light and posing. Other in-camera creative techniques include light painting and long exposure photography.
How do you do a double exposure on a camera?
Find the multiple exposure option in your shooting menu, set the number of frames to two, and choose a blend mode such as Average or Additive. Shoot a silhouette against a bright background first, then shoot a textured second image. Many Canon, Nikon, and Fujifilm models support this; check your manual for your model.
What is the best blend mode for a double exposure?
Screen or Lighten in editing, and Average or Additive in camera, for the classic look of a dark silhouette filled with a second image. Multiply or Darken does the opposite, letting a dark texture show through the bright parts of the first photo.
Why is my double exposure too bright?
Additive mode adds the light from both frames, so two normal exposures come out too bright. Underexpose each frame by about one stop for a two-frame image, or switch to Average, which reduces each frame automatically.
Can I make a double exposure with a phone?
Yes, by shooting two separate photos and blending them in an editing app that supports layers and blend modes. Use the same method: a silhouette against a bright sky plus a textured second image, combined with Screen or Lighten.
Practice this
Turn the guide into a working setup
Keep going
Next useful steps
Pick one. Each link continues the same job without starting the research over.
Related Learn guides
Aperture Priority vs Shutter Priority: Which to Use
Aperture priority lets you control depth of field; shutter priority lets you control motion. Here is what each mode locks, what it leaves to the camera, and when to pick which.
Back Button Focus Explained: What It Is and Why to Use It
Back button focus moves focusing off the shutter button onto a rear button, so the shutter only takes the photo. Here is what it does and how to set it up.
Backlight and Silhouettes: Shooting Into the Light
When the light is behind your subject, it either glows or goes black. Here is how to control which one you get.
Composition Techniques: Five Habits That Build Better Photos
Composition is a set of repeatable habits, not innate talent. Here are five techniques that decide whether a photo is worth looking at.
Researched, not personally tested: picks compare specifications, available owner feedback, and established expert sources. As an Amazon Associate I earn from qualifying purchases. We may earn a commission from links here, at no extra cost to you. How we research →